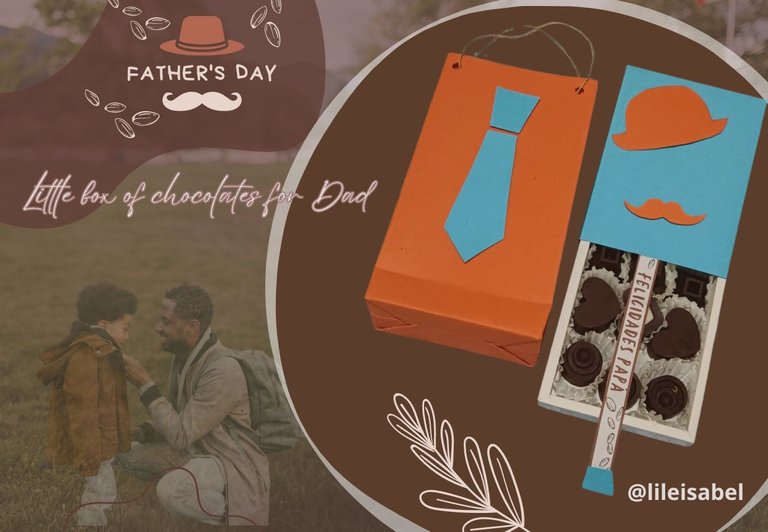
Hello friends of Diy Hub, I haven't posted here for some time but I've been a little busy, three months ago I started a new venture with my son of handmade chocolates, it is very soon ain but everything is going very well and we are very happy with the results, but we have a lot of work and it costs me a lot to make publications, but this time I wanted to bring to the community some boxes with their bags that we designed to offer our delicious chocolates for Father's Day. First of all I wanted to send warm congratulations to all fathers, have a happy day with your family.
Here I will show you the materials I used and the creation process.
Hola amigos de Diy Hub , hace algún tiempo no público por acá pero es que he estado un tanto ocupada , hace tres meses comencé un nuevo emprendimiento junto a mi hijo de bombones artesanales , es muy pronto ain pero todo marcha muy buen y estamos muy contentos con los resultados, pero tenemos mucho trabajo y me cuesta un tanto poder realizar publicaciones, pero en esta ocación quería traer a la comunidad unas cajitas con sus bolsitas que diseñamos para ofertar nuestros deliciosos bombones para el Día del Padre. Primeramente no queria pasar por alto mandarles unas calurosas Felicitaciones a todos los padres, que tengan un dia feliz acompañados de su familia.
A continuación les mostraré los materiales que emplee y el proceso de creación

Materials
White lacquered cardboard
Thin cardboard in blue and orange colors
Hat and mustache molds
Double contact sticker
Ruler
Pencil
Scissors
Silicone
Hole punch
Jute thread
Materiales
Cartulina laqueada blanca
Cartulina fina de colores azul y anaranjado
Moldes de sombreros y bigotes
Adhesivo de doble contacto
Regla
Lapiz
Tijeras
Silicón
Perforadora
Hilo de Yute

First I made the base of the box, which I did with white lacquered cardboard, this way of making the box was taught to me by a friend of my mom's who makes many crafts with paper and cardboard, I really liked this one in particular. I marked a small rectangle of 22 cm long and 19 cm wide and on the four sides I marked lines of the following measures from the edge inwards on the 4 sides of the following measures, 5 millimeters, 2 cm, 5 and 2 cm.
Primero realicé la base de la cajita , la que hice con cartulina blanca laqueada , esta forma de realizar la cajita me la enseñó una amiga de mi mamá que hace muchas manualidades con papel y carton, esta en particular me gustó mucho . Marqué un rectángulo pequeño de 22 cm de largo con 19 cm de ancho y por los cuatro lados se marcan líneas de las siguientes medidas del borde hacia adentro por los 4 lados de las siguientes medidas, 5 milímetros, 2 cm, 5 y 2 cm .

In the corners where the lines converge forming a square, cut the 4 sides as you can see in the photo, in the two most extreme sides that are 9 cm wide, make a quotation in the division of 2 cmas glued to the edge, because that will be the point of convergence of the 4 sides.
Fold all the lines inwards and start gluing the ends with silicone, creating a double wall on each side, it looks very nice and gives a nice finish to the box.
En las esquinas donde las lineas convergen formando un cuadrado se corta quedando los 4 lados como ven en la foto , en los dos lados más extremos que son de 9 cm de realiza un cote en la división de 2 cmas pegada al borde , porque ese será el punto de convergencia de los 4 lados
Se realizan dobleces en todas las lineas hacia adentro y se comienzan a pegar con silicón los extremos , creando una doble pared a cada lado, queda muy bonito y le da un lindo acabado a la cajita.

Now we will make the lid. With the blue cardboard, I marked the four sides of the box, two 2 cm and two 9 cm wide, and 12 cm high. I made a tab on one of the sides so that it would be covered. I glued the ends and obtained a layer that covers the whole box. I really liked this option, since the chocolates are well protected.
Ahora realizaremos la tapa. Con la cartulina de color azul, marqué los cuatro lados de la cajita, dos de 2 cm y dos de 9 cm de ancho, y de alto 12 centímetros. Hice una pestaña en uno de los lados para que quedara cubierta. Pegué los extremos y obtuve una capa que recubre toda la cajita. Me gustó mucho esta opción, ya que los bombones quedan bien resguardados.


I used a printed strip that says "Congratulations Dad" to open the box in a comfortable and original way, while each father receives the congratulations along with the chocolates.
Utilicé una tirita impresa que dice "Felicidades Papá" para abrir la cajita de una forma cómoda y original, mientras cada padre recibe las felicitaciones junto con los bombones.


To finish the box, I copied a mold of a hat and a mustache on orange cardboard, cut them out and glued them with double contact on the lid of the box.
Para finalizar la cajita, copié en cartulina anaranjada un molde de un sombrerito y un bigote, los recorté y los pegué con doble contacto sobre la tapa de la cajita.


To make them, fold a thin orange cardboard 30 cm x 24 cm in the middle and glue it at one end. Then fold 3/4 of the ball and open the ends. Fold them again as shown in the picture and glue them together. This is the bottom of the bag. Then, fold the sides, make the holes on the top with the hole punch and, by inserting the folds inwards, the bag is ready. It is very easy to make.
Para hacerlas se dobla al medio una cartulina delgada anaranjada de 30cm x 24 cm y se pega por un extremo. Luego se dobla por las 3/4 partes de la bolcita y se abren los extremos. Se vuelven a doblar como se observa en la foto y se pegan. Esta es la parte de abajo de la bolsa. A continuación, se dobla por los laterales, se le realizan los agujeros en la parte de arriba con la perforadora y, al introducir los dobleces hacia adentro, queda confeccionada la bolsita. Es muy fácil de realizar.


To finish, I copied a tie and knot pattern on the thin blue cardstock, cut them out and glued them to the bag with double contact. I also added a jute twine handle.
Para terminar, copié un patrón de corbata y nudo en la cartulina azul fina, los recorté y los pegué a la bolsa con doble contacto. También añadí un asa de cordel de yute.
On the front of the box, under the paper ribbon that opens the box, we place the logo of our small business, "Chocolates Alile". We place the chocolates inside and we have this small but delicious gift of handmade chocolates, where everything is 100% handmade.
Greetings to all the friends of DIY Hub and may the dads celebrate their day with love, surrounded by the whole family.
En el frente de la caja, debajo del listón de papel que abre la caja, colocamos el logo de nuestro pequeño negocio, “Chocolates Alile”. Colocamos los chocolates dentro y tenemos este pequeño pero delicioso obsequio de chocolates hechos a mano, donde todo es 100% artesanal.
Saludos a todos los amigos de DIY Hub y que los papás celebren su día con mucho amor, rodeados de toda la familia.


Las fotos fueron tomadas con mi teléfono Xiaomi Note 11, unidas y recreadas en canva.
Usar Traductor DeepL
The photos were taken with my Xiaomi Note 11 phone, joined and recreated in canva.
Use Translator DeepL
