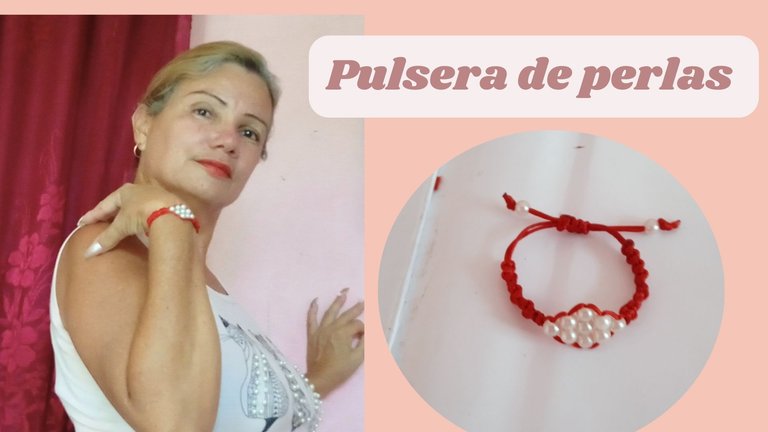

Hello, it is a pleasure to be back in this #Jewerly community which I really like as it allows me to show the different accessories that I am often making for myself or my daughters and we don't necessarily need to go to a store to show off a nice ornament. , and today I come to show you how, with few resources and in a simple way, I made this bracelet.

Hola es un placer estar nuevamente en esta comunidad de #Jewerly la cual me gusta mucho ya que me permite mostrar los distintos acsesorios que frecuente estoy realizando para mi o para mis hijas y es que no necesariamente necesitamos ir a una tienda para lucir un lindo adorno, y hoy vengo a mostrar le como con pocos recursos y de manera sencilla realicé esta pulsera.
MATERIALES
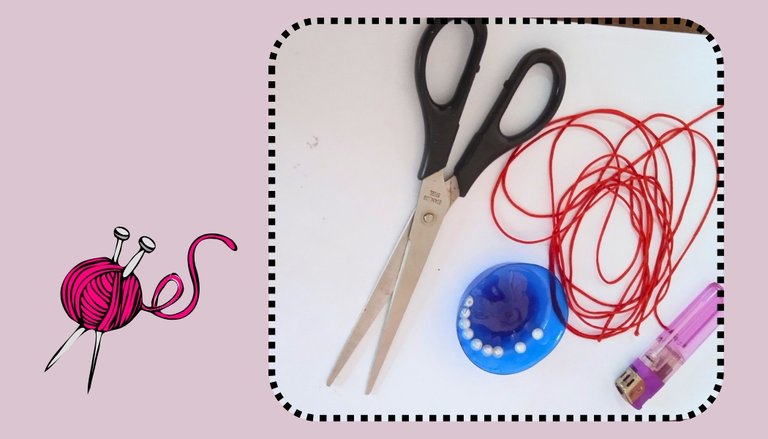
Para realizar la pulsera de perlas utilicé los siguientes materiales
- 11 perlas blancas.
- 2 hilos rojo chino de 75 cm de largo.
- 2 hilo rojo chino de 25 cm
- 1 hilo rojo de 10 cm.
- Tijera.
- Fosforera.
MATERIALS
To make the pearl bracelet I used the following materials
- 11 white pearls.
- 2 Chinese red threads 75 cm long.
- 2 25 cm Chinese red thread
- 1 10 cm red thread.
- Scissors.
- Matchbox.

Para comenzar la pulsera coloqué los dos hilos de 75 cm debajo de una presilla dejando 10 cm por encima de la presilla y por la parte de abajo también los sujete con otra presilla, estos dos hilos son los hilos centrales.
Luego tomo un hilo de 25 cm lo paso por debajo de los hilos centrales de tal forma que quede a la mitad y comienzo hacer el nudo plano o punto macrame, este es un nudo muy sencillo de hacer, empezamos por el lado derecho haciendo un semicirculo por encima de los hilos centrales y luego con el lado izquierdo lo pasamos por debajo de los hilos centrales y lo sacamos por el semicirculo que hicimos a la derecha y así tenemos nuestros primer nudo, ahora continuamos pero por el lado izquierdo y así sucesivamente hasta llegar a 14 puntos, la cantidad depende del ancho de la muñeca y de la mano de cada cual.
Con ayuda de la tijera cortamos los sobrantes y con la fosforera quemamos las puntas para que no se pierda el tejido.
To start the bracelet I placed the two 75 cm threads under a loop, leaving 10 cm above the loop and at the bottom I also secured them with another loop, these two threads are the central threads.
Then I take a 25 cm thread and pass it under the central threads so that it is in the middle and I begin to make the flat knot or macrame stitch. This is a very simple knot to make. We start on the right side making a semicircle. above the central threads and then with the left side we pass it under the central threads and we take it out through the semicircle that we made on the right and thus we have our first knot, now we continue but on the left side and so on until we reach to 14 points, the amount depends on the width of the wrist and hand of each person.
With the help of the scissors we cut the excess and with the match we burn the ends so that the fabric is not lost.
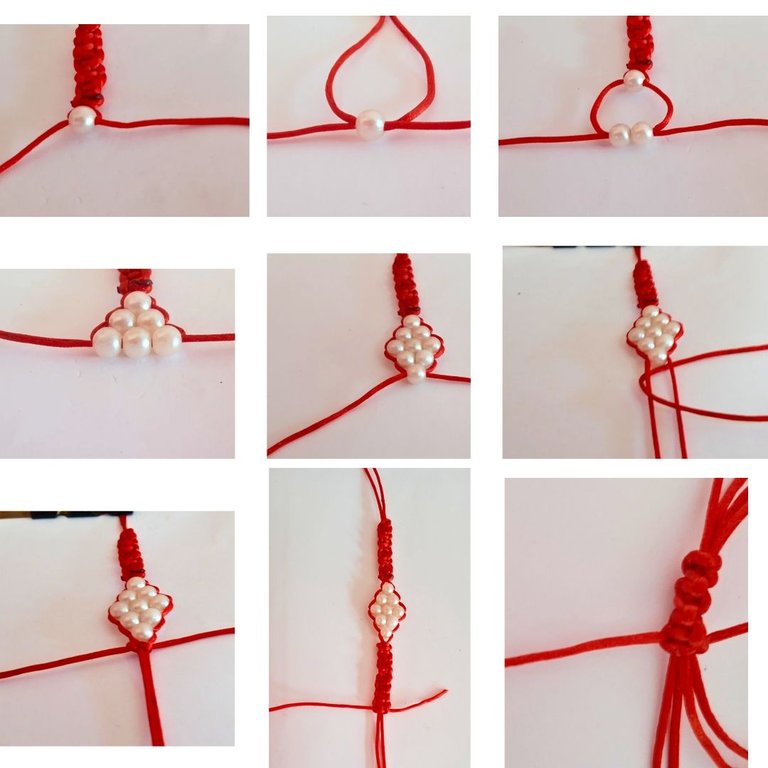
Ahora les toca el turno a los hilos centrales, los quito de la presilla de abajo y comienzo a pasar las perlas de un lado a otro con ambos hilos, primero una perla, luego dos perlas y por último tres de ahí bajo nuevamente a dos perlas y a una, formando una linda figura geométrica.
Tomo el otro hilo de 25 cm y repito el mismo procedimiento del principio.
Y para realizar el cierre utilizo el hilo de 10 cm, uniendo ambas puntas y pasando por debajo de las puntas el hilo de 10 cm realizando el mismo nudo, ya que este nudo va a permitir que ambas puntas se deslicen y se haga más fácil introducir la mano en la pulsa.
Now it is the turn of the central threads, I remove them from the loop below and begin to pass the pearls from one side to the other with both threads, first one pearl, then two pearls and finally three from there I go down to two again pearls and one, forming a beautiful geometric figure.
I take the other 25 cm thread and repeat the same procedure at the beginning.
And to make the closure I use the 10 cm thread, joining both ends and passing the 10 cm thread under the ends making the same knot, since this knot will allow both ends to slide and make it easier to insert. the hand on the pulse.
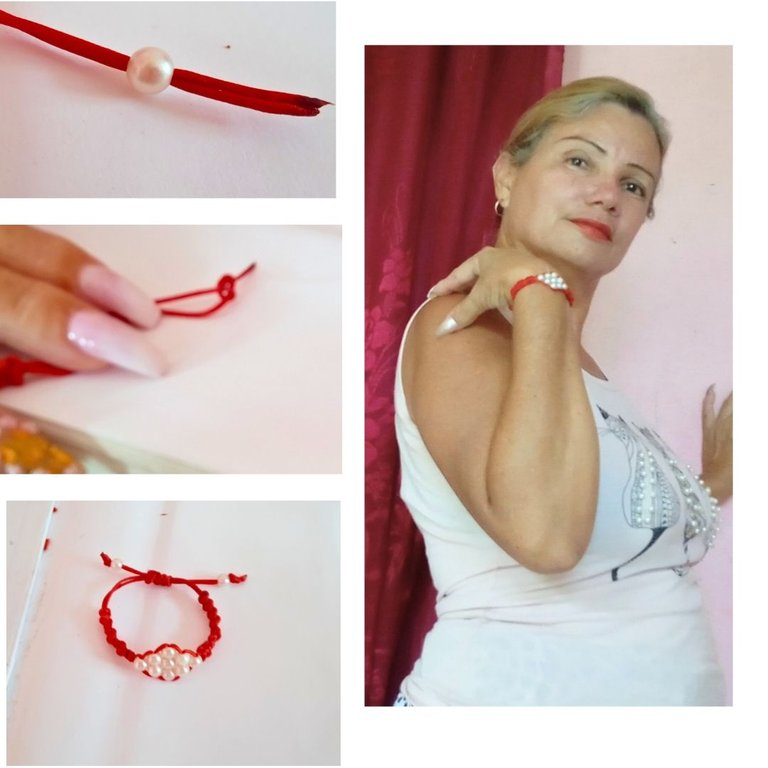
Para terminar colocamos una perla en cada punta de la pulsa, realizamos un nudito con ayuda de los dedos y retiramos con la tijera lo que sobra y con la fosforera quemamos con mucho cuidado para dar el acabado final.
Este es el resultado final de mi pulsera, espero que te guste tanto como a mí y me lo dejes saber en los comentarios.
Nos vemos en un próximo tutorial, hasta entonces les deseo un Feliz día.
To finish, we place a pearl on each end of the pulse, we make a knot with the help of our fingers and we remove what is left over with the scissors and with the match we burn very carefully to give the final finish.
This is the final result of my bracelet, I hope you like it as much as I do and let me know in the comments.
See you in a next tutorial, until then I wish you a Happy Day.
The photos were taking with my pnone and editated with
CANVA
Las fotos fueron tomadas con mi teléfono y editadas en
canva
Translated by Deepl.com
Traducido por Deepl.com


